Multipath Playground
22 Apr 2015The vast majority of production Oracle database installations takes now advantage of the multi-pathing facility so that to ensure HA via redundant paths to the storage. However, if you want to see this feature in action and want to play with it, you may find it difficult without a testing SAN available. In this post I want to cover a simple setup for testing the default multipath facility provided by all modern Linux systems. There are other multipath commercial solutions available (e.g. PowerPath from DELL), but they won’t be covered here.
Setup Overview
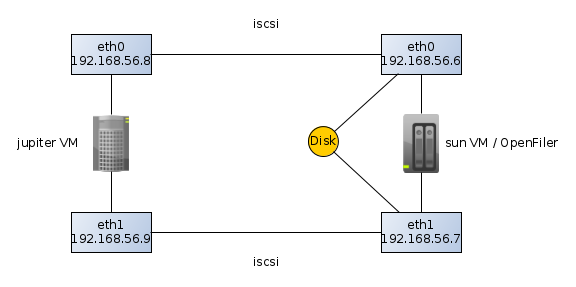
Below is what we’d need for this playground:

jupiter and sun are both virtual machines running on VirtualBox. jupiter
is an OEL 6.3 and sun is an openfiler.
Please note that these machines have been setup with two NICs in order to
simulate the two paths to the same disk. The sun server has two disks attached
(from VirtualBox): one for the OS and the other for creating disk volumes to be
published to other hosts (in this case to jupiter).
Open filer setup
Just install the downloaded open filer image into a new virtual box host. Don’t forget to configure two NICs. As soon as the installation is finished you may access the web interface via:
https://192.168.56.6:446/
The default credentials are: openfiler/password.
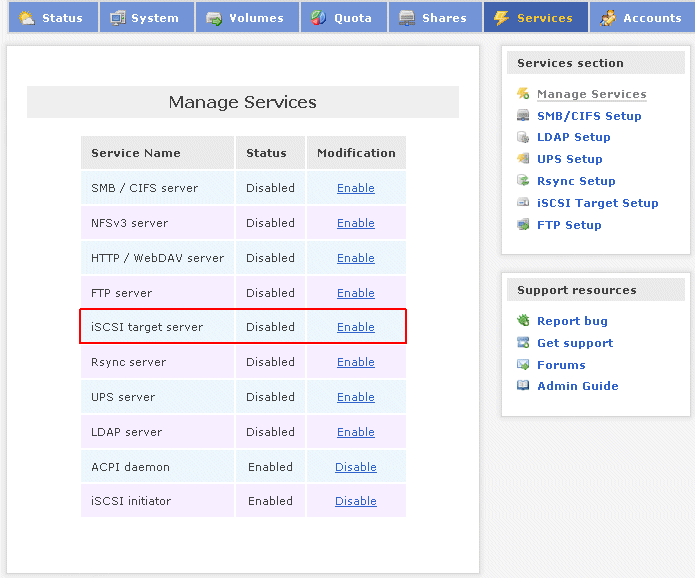
The first step is to enable the “iSCSI target server” service.

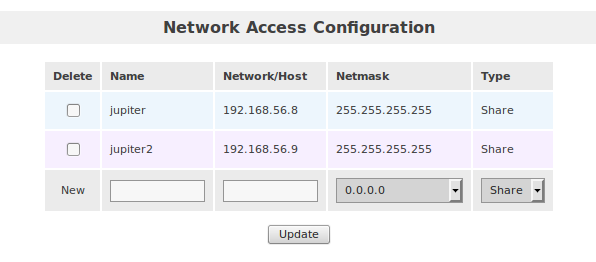
Then we need to grant access to jupiter in order to access the san.

Ready now to prepare the storage. Go to “Volumes/Block Devices”:

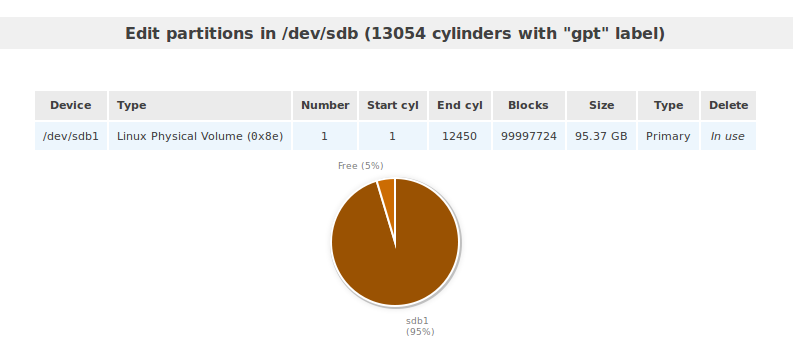
The disk we want to use for publishing is /dev/sdb. Click on that link in
order to partition it. Then create a big partition, spanning the entire disk.

Next, go to “Volumes/Volume Groups” and create a volume group called “oracle”.

Now, we can create the logical volumes. Go to “Volumes/Add Volume” and create a
new volume of type “block”. I gave 10G and I call it jupiter1.
It’s now time to configure our openfiler as an iSCSI target server. Go to
“Volumes/iSCSI Targets/Target Configuration”. Add the following Target IQN:
iqn.2006-01.com.openfiler:jupiter. Then go, to “LUN Mapping” and map this
volume. We also need to configure ACLs on the volume level using the “Network
ACL” tab:

Jupiter Setup
First of all, it is a good thing to upgrade to the last version. Multipath-ing software may be affected by various bugs, so it’s better to run with the last version available.
iSCSI Configuration
The following packages are mandatory:
device-mapper-multipath
device-mapper-multipath-lib
iscsi-initiator-utils
Next, configure the iscsi initiator:
service iscsid start
chkconfig iscsid on
chkconfig iscsi on
Ok, let’s import the iSCSI disks:
iscsiadm -m node -T iqn.2006-01.com.openfiler:jupiter -p 192.168.56.6
iscsiadm -m node -T iqn.2006-01.com.openfiler:jupiter -p 192.168.56.7
If it’s working, then we can set those disks to be added on boot:
iscsiadm -m node -T iqn.2006-01.com.openfiler:jupiter -p 192.168.56.6 --op update -n node.startup -v automatic
iscsiadm -m node -T iqn.2006-01.com.openfiler:jupiter -p 192.168.56.7 --op update -n node.startup -v automatic
Now we should have two new disks:
[root@jupiter ~]# fdisk -l

Disk /dev/sda: 52.4 GB, 52428800000 bytes
255 heads, 63 sectors/track, 6374 cylinders
Units = cylinders of 16065 * 512 = 8225280 bytes
Sector size (logical/physical): 512 bytes / 512 bytes
I/O size (minimum/optimal): 512 bytes / 512 bytes
Disk identifier: 0x00058a16

  Device Boot      Start         End      Blocks   Id  System
/dev/sda1   *           1        6375    51198976   83  Linux

Disk /dev/sdc: 11.5 GB, 11475615744 bytes
255 heads, 63 sectors/track, 1395 cylinders
Units = cylinders of 16065 * 512 = 8225280 bytes
Sector size (logical/physical): 512 bytes / 512 bytes
I/O size (minimum/optimal): 512 bytes / 512 bytes
Disk identifier: 0x30a7ae71

Disk /dev/sdb: 11.5 GB, 11475615744 bytes
255 heads, 63 sectors/track, 1395 cylinders
Units = cylinders of 16065 * 512 = 8225280 bytes
Sector size (logical/physical): 512 bytes / 512 bytes
I/O size (minimum/optimal): 512 bytes / 512 bytes
Disk identifier: 0x30a7ae71
Multipath Configuration
Start with a simple /etc/multipath.conf configuration file:
blacklist {
  devnode "^(ram|raw|loop|fd|md|dm-|sr|scd|st)[0-9]*"
  devnode "^hd[a-z]"
  devnode "^cciss!c[0-9]d[0-9]*[p[0-9]*]"
}

defaults {
  find_multipaths yes
  user_friendly_names yes
  failback immediate
}
Now, let’s check if the multipath can figure out how to aggregate the paths
under one single device:
[root@jupiter ~]# multipath -v2 -ll
mpathb (14f504e46494c4552674774717a782d7030585a2d31514b4d) dm-0 OPNFILER,VIRTUAL-DISK
size=11G features='0' hwhandler='0' wp=rw
|-+- policy='round-robin 0' prio=1 status=active
| `- 3:0:0:0 sdc 8:32 active ready running
`-+- policy='round-robin 0' prio=1 status=enabled
  `- 2:0:0:0 sdb 8:16 active ready running
As shown above, multipath has aggregated those two disks under the
mpathb/dm-0. The wwid of those disks is
14f504e46494c4552674774717a782d7030585a2d31514b4d. This piece of information
can be useful in order to set special properties on the disk level. For example,
we can assign an alias to this disk by adding the following section into the
configuration file.
multipaths {
  multipath {
    wwid                    14f504e46494c4552674774717a782d7030585a2d31514b4d
    alias                   oradisk
  }
}
Now, we can start the multipathd daemon:
service multipathd start
fdisk should report now the new multipath disk:
Disk /dev/mapper/oradisk: 11.5 GB, 11475615744 bytes
255 heads, 63 sectors/track, 1395 cylinders
Units = cylinders of 16065 * 512 = 8225280 bytes
Sector size (logical/physical): 512 bytes / 512 bytes
I/O size (minimum/optimal): 512 bytes / 512 bytes
Disk identifier: 0x30a7ae71
You may partition it as you’d do with a regular disk.
Test the Multipath Configuration
The idea is to simulate a path failure. In this iSCSI configuration is easy to
do this by shutting down one eth at a time. For example, login to sun and
shutdown the eth0 interface:
ifdown eth0
In /var/log/messages of the jupiter server you should see:
Apr 22 16:48:06 jupiter kernel: connection2:0: ping timeout of 5 secs expired, recv timeout 5, last rx 4308454544, last ping 4308459552, now 4308464560
Apr 22 16:48:06 jupiter kernel: connection2:0: detected conn error (1011)
Apr 22 16:48:06 jupiter iscsid: Kernel reported iSCSI connection 2:0 error (1011 - ISCSI_ERR_CONN_FAILED: iSCSI connection failed) state (3)
You can confirm that the path is down using:
[root@jupiter ~]# multipath -ll
oradisk (14f504e46494c4552674774717a782d7030585a2d31514b4d) dm-0 OPNFILER,VIRTUAL-DISK
size=11G features='0' hwhandler='0' wp=rw
|-+- policy='round-robin 0' prio=1 status=active
| `- 3:0:0:0 sdc 8:32 active ready  running
`-+- policy='round-robin 0' prio=0 status=enabled
  `- 2:0:0:0 sdb 8:16 active faulty running
Note the faulty state for the 2:0:0:0 path.
Now, startup the eth0 interface:
ifup eth0
In /var/log/messages you should see:
Apr 22 16:54:55 jupiter iscsid: connection1:0 is operational after recovery (26 attempts)
Apr 22 16:54:56 jupiter multipathd: oradisk: sdb - directio checker reports path is up
Apr 22 16:54:56 jupiter multipathd: 8:16: reinstated
Apr 22 16:54:56 jupiter multipathd: oradisk: remaining active paths: 2
Learned Lessons
If another disk is added in Open Filer, on the clients (jupiter) you need to rescan the iSCSI disks:
iscsiadm -m node -R
Usually, the multipath daemon, if running, we’ll pick the new disk right away. However, if you want to assign an alias, you’ll have to amend the configuration file and do a:
service multipathd reload
According to my tests, adding a new disk can be done online. However, that doesn’t apply in case of resizing an existing disk. Openfiler can only extend an existing disk. Downsizing is not an option.
Even Openfiler allows you to increase the disk size via its GUI, the new size is not seen by the initiators. Even though the initiator (jupiter) is rescanning its iSCSI disks, their size is not refreshed. What I found is that you need to restart the iSCSI target server service on Openfiler in order to publish the new size. This is quite an annoying limitation, considering that you shouldn’t do this if the published disks are in use. The conclusion is that it is possible to add new disks online, but increasing the size of an existing disk can’t be done online.