25 May 2016
It’s not the first time when the RMAN snapshot controlfile feature causes
problems. I blogged about this in an old
post.
It starts with a funny message when you want to drop the obsolete backups:
RMAN-06207: WARNING: 1 objects could not be deleted for DISK channel(s) due
RMAN-06208:          to mismatched status.  Use CROSSCHECK command to fix status
RMAN-06210: List of Mismatched objects
RMAN-06211: ==========================
RMAN-06212:   Object Type   Filename/Handle
RMAN-06213: --------------- ---------------------------------------------------
RMAN-06214: Datafile Copy   /u01/app/oracle/product/11.2.0/db_11204/dbs/snapcf_volp1.f
In the case above, the message comes from a daily backup script which also takes
care of deleting the obsolete backups. However, the target database is a RAC one
and this snapshot controlfile needs to sit on a shared location. So, we
fixed the issue by simply changing the location to ASM:
RMAN> CONFIGURE SNAPSHOT CONTROLFILE NAME TO '+DG_FRA/snapcf_volp.f';

old RMAN configuration parameters:
CONFIGURE SNAPSHOT CONTROLFILE NAME TO '/u01/app/oracle/product/11.2.0/db_11204/dbs/snapcf_volp1.f';
new RMAN configuration parameters:
CONFIGURE SNAPSHOT CONTROLFILE NAME TO '+DG_FRA/snapcf_volp.f';
new RMAN configuration parameters are successfully stored
Ok, now let’s get rid of that
/u01/app/oracle/product/11.2.0/db_11204/dbs/snapcf_volp1.f file. By the way,
have you noticed that it is considered to be a datafile copy instead of a
controlfile copy? Whatever…
The first try was:
RMAN> delete expired copy;

released channel: ORA_DISK_1
allocated channel: ORA_DISK_1
channel ORA_DISK_1: SID=252 instance=volp1 device type=DISK
specification does not match any datafile copy in the repository
specification does not match any archived log in the repository

List of Control File Copies
===========================

Key     S Completion Time     Ckp SCN    Ckp Time
------- - ------------------- ---------- -------------------
42      X 2016-05-14 16:48:48 3152170591 2016-05-14 16:48:48
        Name: /u01/app/oracle/product/11.2.0/db_11204/dbs/snapcf_volp1.f
        Tag: TAG20160514T164847

Do you really want to delete the above objects (enter YES or NO)? YES
RMAN-00571: ===========================================================
RMAN-00569: =============== ERROR MESSAGE STACK FOLLOWS ===============
RMAN-00571: ===========================================================
RMAN-03009: failure of delete command on ORA_DISK_1 channel at 05/25/2016 08:35:09
ORA-19606: Cannot copy or restore to snapshot control file
Ups, WTF? I don’t want to copy or restore anyting! Whatever… Next try:
RMAN> crosscheck controlfilecopy '/u01/app/oracle/product/11.2.0/db_11204/dbs/snapcf_volp1.f';

released channel: ORA_DISK_1
allocated channel: ORA_DISK_1
channel ORA_DISK_1: SID=252 instance=volp1 device type=DISK
validation failed for control file copy
control file copy file name=/u01/app/oracle/product/11.2.0/db_11204/dbs/snapcf_volp1.f RECID=42 STAMP=911839728
Crosschecked 1 objects

RMAN> delete expired controlfilecopy '/u01/app/oracle/product/11.2.0/db_11204/dbs/snapcf_volp1.f';


released channel: ORA_DISK_1
allocated channel: ORA_DISK_1
channel ORA_DISK_1: SID=497 instance=volp1 device type=DISK

List of Control File Copies
===========================

Key     S Completion Time     Ckp SCN    Ckp Time
------- - ------------------- ---------- -------------------
42      X 2016-05-14 16:48:48 3152170591 2016-05-14 16:48:48
        Name: /u01/app/oracle/product/11.2.0/db_11204/dbs/snapcf_volp1.f
        Tag: TAG20160514T164847


Do you really want to delete the above objects (enter YES or NO)? yes
RMAN-00571: ===========================================================
RMAN-00569: =============== ERROR MESSAGE STACK FOLLOWS ===============
RMAN-00571: ===========================================================
RMAN-03009: failure of delete command on ORA_DISK_1 channel at 05/25/2016 08:41:11
ORA-19606: Cannot copy or restore to snapshot control file
The same error! Even trying with the backup key wasn’t helpful:
RMAN> delete controlfilecopy 42;

released channel: ORA_DISK_1
allocated channel: ORA_DISK_1
channel ORA_DISK_1: SID=252 instance=volp1 device type=DISK

List of Control File Copies
===========================

Key     S Completion Time     Ckp SCN    Ckp Time
------- - ------------------- ---------- -------------------
42      X 2016-05-14 16:48:48 3152170591 2016-05-14 16:48:48
        Name: /u01/app/oracle/product/11.2.0/db_11204/dbs/snapcf_volp1.f
        Tag: TAG20160514T164847

Do you really want to delete the above objects (enter YES or NO)? yes

RMAN-00571: ===========================================================
RMAN-00569: =============== ERROR MESSAGE STACK FOLLOWS ===============
RMAN-00571: ===========================================================
RMAN-03009: failure of delete command on ORA_DISK_1 channel at 05/25/2016 08:38:30
ORA-19606: Cannot copy or restore to snapshot control file
The fix was to restore the old location of the snapshot controlfile and then to
delete the expired copy:
RMAN> configure snapshot controlfile name to '/u01/app/oracle/product/11.2.0/db_11204/dbs/snapcf_volp1.f';

old RMAN configuration parameters:
CONFIGURE SNAPSHOT CONTROLFILE NAME TO '+dg_fra/snapcf_volp.f';
old RMAN configuration parameters:
CONFIGURE SNAPSHOT CONTROLFILE NAME TO '+DG_FRA/snapcf_volp.f';
new RMAN configuration parameters:
CONFIGURE SNAPSHOT CONTROLFILE NAME TO '/u01/app/oracle/product/11.2.0/db_11204/dbs/snapcf_volp1.f';
new RMAN configuration parameters are successfully stored


RMAN> delete expired copy;

allocated channel: ORA_DISK_1
channel ORA_DISK_1: SID=788 instance=volp1 device type=DISK
specification does not match any datafile copy in the repository
specification does not match any archived log in the repository

List of Control File Copies
===========================

Key     S Completion Time     Ckp SCN    Ckp Time
------- - ------------------- ---------- -------------------
42      X 2016-05-14 16:48:48 3152170591 2016-05-14 16:48:48
        Name: /u01/app/oracle/product/11.2.0/db_11204/dbs/snapcf_volp1.f
        Tag: TAG20160514T164847

Do you really want to delete the above objects (enter YES or NO)? yes

deleted control file copy
control file copy file name=/u01/app/oracle/product/11.2.0/db_11204/dbs/snapcf_volp1.f RECID=42 STAMP=911839728
Deleted 1 EXPIRED objects
Don’t ask me why it worked. Of course, after we fixed the expired copy the
snapshot controlfile location was set to a shared disk.
18 Apr 2016
Funny thing happen today. I was asked to install a 12.1.0.2 RAC database. The
hardware and the OS prerequisites were, in their vast majority, previously
addressed, so everything was ready for the installation. Of course, as you
already know, Oracle is quite picky about the expected environment (and for a
good reason) and it checks a lot of things before starting the actual
installation. Of course, sometimes it does this horribly. For example, take a
look at the following screenshot:
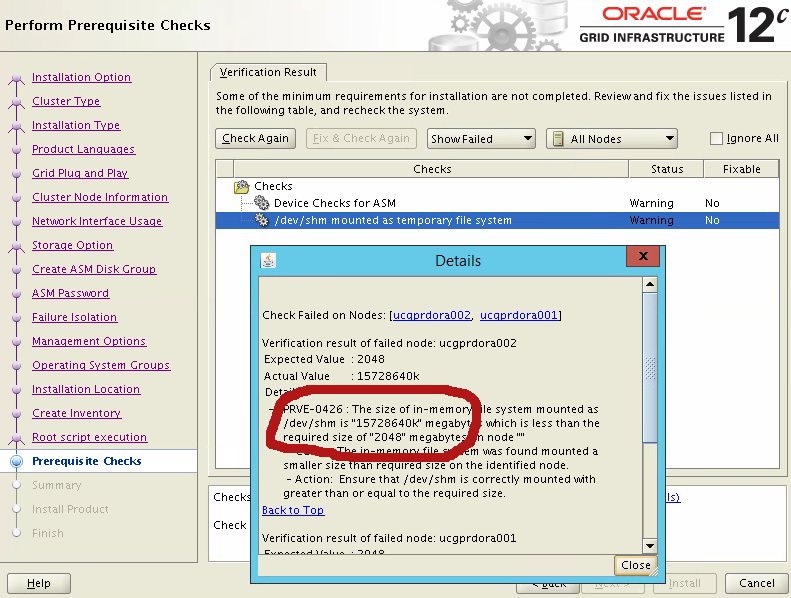
Apparently this is due to unpublished Bug 19031737 and can be ignored if the
setting is correctly set in the OS.
Everything went smooth until I ran the root.sh script. I ended up with:
/u01/app/12.1.0/2_grid/bin/sqlplus -V ... failed rc=1 with message:
 Error 46 initializing SQL*Plus HTTP proxy setting has incorrect value SP2-1502: The HTTP proxy server specified by http_proxy is not accessible

2016/03/30 13:53:15 CLSRSC-177: Failed to add (property/value):('VERSION'/'') for checkpoint 'ROOTCRS_STACK' (error code 1)

2016/03/30 13:53:39 CLSRSC-143: Failed to create a peer profile for Oracle Cluster GPnP using 'gpnptool' (error code 1)

2016/03/30 13:53:39 CLSRSC-150: Creation of Oracle GPnP peer profile failed for host 'ucgprdora001'

Died at /u01/app/12.1.0/2_grid/crs/install/crsgpnp.pm line 1846.
The command '/u01/app/12.1.0/2_grid/perl/bin/perl -I/u01/app/12.1.0/2_grid/perl/lib -I/u01/app/12.1.0/2_grid/crs/install /u01/app/12.1.0/2_grid/crs/install/rootcrs.pl ' execution failed
Stupid! Our sysadmin set a global http_proxy variable which confused sqlplus
and, by extension, the root.sh script.
Wouldn’t be a good idea cluvfy to check also if this variable is correctly set
(or unset)?
Until then, I put this as a note to myself: don’t forget to always unset
http_proxy variable before starting to install a new Oracle server.
07 Jan 2016
Yesterday we migrated one of the customers Oracle servers from 11.2 to 12.1.0.2.
It was a single instance server, the volume of data wasn’t very impressive and
it was also a Standard Edition installation. So, nothing special, nothing scary.
We though it would be a simple task. Hmmm… Let’s see.
What Oracle Edition?
Licensing, editions, options… I’m starting to get annoyed by all these
non-technical topics. But, that’s life, we have to deal with them. In this
particular case, the customer asked us to upgrade their standard edition
database running on 11.2.0.4 to Oracle 12.1.0.2. Super, but guess what? There’s
no plain Standard Edition or Standard Edition One released for 12.1.0.2, just
for 12.1.0.1. The only available edition on 12.1.0.2 is Oracle SE2 (Standard
Edition 2) and, apparently, that’s the only standard edition Oracle is committed
to support for the next releases. For details, please see Note:
2027072.1.
DATA_PUMP_DIR Bug
The upgrade was a success, at least this is what we thought. Well, bad luck. In
the morning the customer reported that a schema which is supposed to be
replicated every night was not there. Ups! We analysed the logs and we could
notice that the impdp utility was complaining that the source dump couldn’t be
accessed. What? The import was configured to use the DATA_PUMP_DIR oracle
directory which was configured to point out to a specific location on the
database server. After the upgrade it was changed to $ORACLE_HOME/rdbms/log.
Great! I wasn’t aware of this. Most likely, we hit the following bug:
Bug 9006105 - DATA_PUMP_DIR is not remapped after database upgrade [ID 9006105.8]
It’s an unpublished bug, so I can’t see much besides what is already shown in
the subject. However, in the note they claim that they managed to fix it in
11.2.0.2 and 12.1.0.1. Well, apparently not.
Conclusion
As always, Oracle upgrades are such a joy. Expect the unexpected… Anyways, I’m
starting to have doubts that using the DATA_PUMP_DIR directory is such a good
idea. In the light of what happen, I think it’s always better to create and use
your own oracle directory. Not to mention, DATA_PUMP_DIR can’t be used from
within a pluggable database if you plan to use this option on a 12c
database.
02 Jan 2016
We want to easily flashback just a part of the database. We need this for our
developers which are sharing the same database, but using just their allocated
schema and tablespaces. They want to be allowed to set a restore point (on the
schema level), to run their workload and then to be able to revert back their
schema as it was when the restore point was taken. The other users on the
database must not be disrupted in any way.
Of course, flashback database feature is not good enough because it reverts back
the entire database and can’t be used without downtime. On the other hand, a
TSPITR (Tablespace point in time recovery) on big data-files is a PITA from the
speed point of view, especially because we need to copy those big files when the
transportable set is created and, again, as part of the restore, when we need to
revert back.
In addition, we want this to work even on an Oracle standard edition.
The Idea
Use a combination of TSPITR and a file system with snapshotting capabilities. As
a proof of concept, we’ll use btrfs, but
it can be zfs or other exotic file systems.
Below is how the physical layout of the database should be designed.
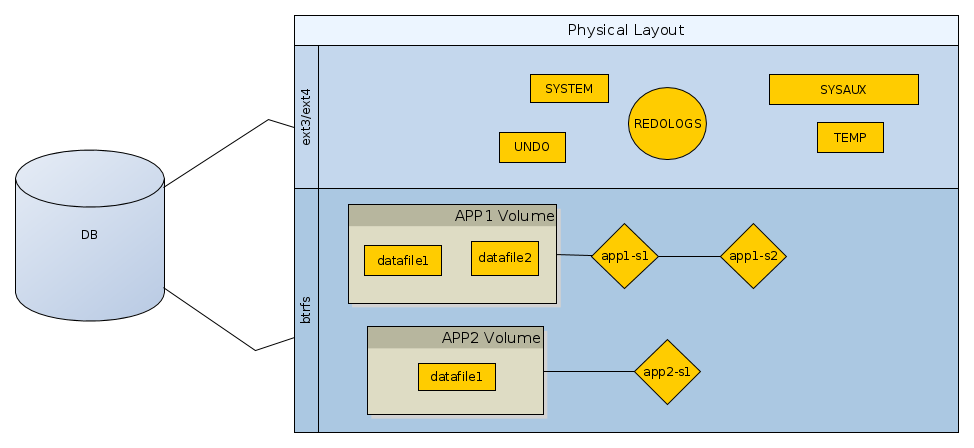
As you can see, the non-application datafiles, or those which do not need any
flashback functionality, may reside on a regular file system. However, the
datafiles belonging to the applications which need the “time machine”, have to
be created in a sub-volume of the btrfs pool. For each sub-volume we can
create various snapshots, as shown in the above figure: app1-s1, app1-s2
etc.
To create a restore point for the application tablespaces we’ll do the following:
- put the tablespaces for the application in read only mode (FAST, we assume
that no long-running/pending transactions are active)
- create a transportable set for those tablespace. So, we end up with a
dumpfile having the metadata for the above read only tablespaces. (pretty
FAST, only segment definitions are exported)
- export all non-tablespace database objects (sequences, synonyms etc.) for
the target schema. (pretty FAST, no data, just definitions)
- take a snapshot of the sub-volume assigned to the application. That
snapshot contain the read-only datafiles, the dump file from the
transportable set and the dump file with all the non-tablespace
definitions. (FAST, because we rely on the snapshotting feature which is
fast by design)
- put the tablespaces back in read only mode (FAST).
For a flashback/revert, the steps are:
- delete the application user and its tablespaces (pretty FAST. it depends on
how many objects needs to be dropped)
- switch to snapshot (FAST, by design)
- reimport user from the non-tablespace dumpfile (FAST)
- re-attached the read only tablespaces from the transportable set (FAST)
- reimport the non-tablespace objects (FAST, just definitions)
- put the tablespaces back in read write (FAST)
Playground Setup
On OL6.X we need to install this:
Next, create the main volume:
[root@venus ~]# fdisk -l

Disk /dev/sda: 52.4 GB, 52428800000 bytes
255 heads, 63 sectors/track, 6374 cylinders
Units = cylinders of 16065 * 512 = 8225280 bytes
Sector size (logical/physical): 512 bytes / 512 bytes
I/O size (minimum/optimal): 512 bytes / 512 bytes
Disk identifier: 0x0003cb01

   Device Boot      Start         End      Blocks   Id  System
/dev/sda1   *           1        6375    51198976   83  Linux

Disk /dev/sdb: 12.9 GB, 12884901888 bytes
255 heads, 63 sectors/track, 1566 cylinders
Units = cylinders of 16065 * 512 = 8225280 bytes
Sector size (logical/physical): 512 bytes / 512 bytes
I/O size (minimum/optimal): 512 bytes / 512 bytes
Disk identifier: 0x00000000


Disk /dev/sdc: 12.9 GB, 12884901888 bytes
255 heads, 63 sectors/track, 1566 cylinders
Units = cylinders of 16065 * 512 = 8225280 bytes
Sector size (logical/physical): 512 bytes / 512 bytes
I/O size (minimum/optimal): 512 bytes / 512 bytes
Disk identifier: 0x00000000
The disks we’re going to add are: sdb and sdc.
[root@venus ~]# mkfs.btrfs /dev/sdb /dev/sdc

WARNING! - Btrfs v0.20-rc1 IS EXPERIMENTAL
WARNING! - see http://btrfs.wiki.kernel.org before using

failed to open /dev/btrfs-control skipping device registration: No such file or directory
adding device /dev/sdc id 2
failed to open /dev/btrfs-control skipping device registration: No such file or directory
fs created label (null) on /dev/sdb
        nodesize 4096 leafsize 4096 sectorsize 4096 size 24.00GB
Btrfs v0.20-rc1
Prepare the folder into which to mount to:
[root@venus ~]# mkdir /oradb
[root@venus ~]# chown -R oracle:dba /oradb
Mount the btrfs volume:
[root@venus ~]# btrfs filesystem show /dev/sdb
Label: none  uuid: d30f9345-74bc-42df-a55d-f22e3a9c6e78
        Total devices 2 FS bytes used 28.00KB
        devid    2 size 12.00GB used 2.01GB path /dev/sdc
        devid    1 size 12.00GB used 2.03GB path /dev/sdb

[root@venus ~]# mount -t btrfs /dev/sdc /oradb
[root@venus ~]# df -h
Filesystem            Size  Used Avail Use% Mounted on
/dev/sda1              49G   39G  7.6G  84% /
tmpfs                 2.0G     0  2.0G   0% /dev/shm
bazar                 688G  426G  263G  62% /media/sf_bazar
/dev/sdc               24G   56K   22G   1% /oradb
Create a new sub-volume to host the datafile for a developer schema.
[root@venus /]# btrfs subvolume create /oradb/app1
Create subvolume '/oradb/app1'
[root@venus /]# chown -R oracle:dba /oradb/app1
In Oracle, create a new user with a tablespace in the above volume:
create tablespace app1_tbs
  datafile '/oradb/app1/app1_datafile_01.dbf' size 100M;

create user app1 identified by app1
default tablespace app1_tbs
quota unlimited on app1_tbs;

grant create session, create table, create sequence to app1;
We’ll also need to create a directory to point to the application folder. It is
need for expdp and impdp.
CREATE OR REPLACE DIRECTORY app1_dir AS '/oradb/app1';
Let’s create some database objects:
connect app1/app1
create sequence test1_seq;
select test1_seq.nextval from dual;
select test1_seq.nextval from dual;
create table test1 (c1 integer);
insert into test1 select level from dual connect by level <= 10;
commit;
Create a Restore Point
Now, we want to make a restore point. We’ll need to:
-
put the tablespace in read-only mode:
alter tablespace app1_tbs read only;
-
export tablespace:
[oracle@venus app1]$ expdp userid=talek/*** directory=app1_dir transport_tablespaces=app1_tbs dumpfile=app1_tbs_metadata.dmp logfile=app1_tbs_metadata.log
-
export the other database objects which belong to the schema but they are
not stored in the tablespace:
[oracle@venus app1]$ expdp userid=talek/*** directory=app1_dir schemas=app1 exclude=table dumpfile=app1_nontbs.dmp logfile=app_nontbs.log
-
take a snapshot of the volume (this is very fast):
 [root@venus /]# btrfs subvolume list /oradb
 ID 258 gen 14 top level 5 path app1
 [root@venus app1]# btrfs subvolume snapshot /oradb/app1 /oradb/app1_restorepoint1
 Create a snapshot of '/oradb/app1' in '/oradb/app1_restorepoint1'
-
we can get rid now of the dumps/logs:
 [root@venus app1]# rm -rf /oradb/app1/*.dmp
 [root@venus app1]# rm -rf /oradb/app1/*.log
 [root@venus app1]# ls -al /oradb/app1
 total 102412
 drwx------ 1 oracle dba             40 Nov 13 20:21 .
 drwxr-xr-x 1 root   root            44 Nov 13 20:02 ..
 -rw-r----- 1 oracle oinstall 104865792 Nov 13 20:13 app1_datafile_01.dbf
-
Make the tablespace READ-WRITE again:
alter tablespace app1_tbs read write;
Simulate Workload
Now, let’s simulate running a deployment script or something. We’ll truncate the
TEST1 table and we’ll create the TEST2 table. In addition, the sequence will be
dropped.
20:25:04 SQL> select count(*) from test1;

COUNT(*)
--------
      10

20:25:04 SQL> truncate table test1;

Table truncated.

20:25:29 SQL> select count(*) from test1;

COUNT(*)
--------
       0

20:25:04 SQL> create table test2 (c1 integer, c2 varchar2(100));

Table created.

SQL> drop sequence test1_seq;

Sequence dropped.
As you can see, all the above are DDL statements which cannot be easily
reverted.
Revert to the Restore Point
Ok, so we need to revert back, and fast. The steps are:
-
drop the tablespace:
drop tablespace app1_tbs including contents;
-
drop the user;
-
revert to snapshot on the FS level:
 [root@venus oradb]# btrfs subvolume delete app1
 Delete subvolume '/oradb/app1'
 [root@venus oradb]# btrfs subvolume list /oradb
 ID 259 gen 15 top level 5 path app1_snapshots
 [root@venus oradb]# btrfs subvolume snapshot /oradb/app1_restorepoint1/ /oradb/app1
 Create a snapshot of '/oradb/app1_restorepoint1/' in '/oradb/app1'
-
recreate the user with its non-tablespace objects. Please note that we
remap the tablespace APP1_TBS to USERS because APP1_TBS is not
created yet. Likewise, we exclude the quotas for the same reason.
[oracle@venus scripts]$ impdp userid=talek/*** directory=app1_dir schemas=app1 remap_tablespace=app1tbs:users dumpfile=app1_nontbs.dmp nologfile=y exclude=tablespace_quota
-
reimport the transportable set:
[oracle@venus app1]$ impdp userid=talek/*** directory=app1_dir dumpfile=app1_tbs_metadata.dmp logfile=app1_tbs_metadata_imp.log transport_datafiles='/oradb/app1/app1_datafile_01.dbf'
-
reimport quotas:
[oracle@venus scripts]$ impdp userid=talek/*** directory=app1_dir schemas=app1 remap_tablespace=app1tbs:users dumpfile=app1_nontbs.dmp nologfile=y include=tablespace_quota
-
restore the old value for the default tablespace of the APP1 user:
alter user app1 default tablespace APP1_TBS;
-
make the application tablespace read write:
alter tablespace app1_tbs read write;
-
remove the /oradb/app1/*.dmp and /oradb/app1/*.log files. They are not
needed anymore.
Test the Flashback
Now, if we connect with app1 we get:
22:53:14 SQL> select object_name, object_type from user_objects;

OBJECT_NAME OBJECT_TYPE
----------- -----------
TEST1_SEQ   SEQUENCE
TEST1       TABLE

22:53:48 SQL> select count(*) from test1;

COUNT(*)
--------
      10
We can see that we are back on the previous state, across DDLs. The records from
the TEST1 table and our sequence are back.
Remove an Un-necessary Snapshot
If the snapshot is not needed anymore it can be deleted with:
[root@venus oradb]# btrfs subvolume delete /oradb/app1_restorepoint1
Delete subvolume '/oradb/app1_restorepoint1'
Pros & Cons
The main advantages for this solution are:
-
no need for an Oracle enterprise edition. It's working with a standard
edition without any problems.
- no need to have the database in
ARCHIVELOG.
- no flashback logs needed.
- schema level flashback.
- the database is kept online without any disruption for the other schema
users.
- can be easily scripted/automated
- fast
The disadvantages:
btrfs is not quite production ready, but it is suitable for test/dev
environments. For production systems zfs might be a better alternative.
22 Apr 2015
The vast majority of production Oracle database installations takes now advantage
of the multi-pathing facility so that to ensure HA via redundant paths to the
storage. However, if you want to see this feature in action and want to play
with it, you may find it difficult without a testing SAN available. In this post
I want to cover a simple setup for testing the default multipath facility
provided by all modern Linux systems. There are other multipath commercial
solutions available (e.g. PowerPath from DELL), but they won’t be covered here.
Setup Overview
Below is what we’d need for this playground:
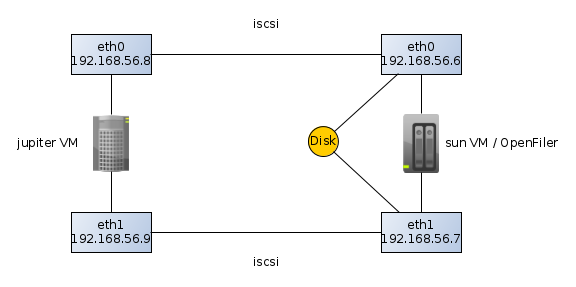
jupiter and sun are both virtual machines running on VirtualBox. jupiter
is an OEL 6.3 and sun is an openfiler.
Please note that these machines have been setup with two NICs in order to
simulate the two paths to the same disk. The sun server has two disks attached
(from VirtualBox): one for the OS and the other for creating disk volumes to be
published to other hosts (in this case to jupiter).
Open filer setup
Just install the downloaded open filer image into a new virtual box host. Don’t
forget to configure two NICs. As soon as the installation is finished you may
access the web interface via:
https://192.168.56.6:446/
The default credentials are: openfiler/password.
The first step is to enable the “iSCSI target server” service.
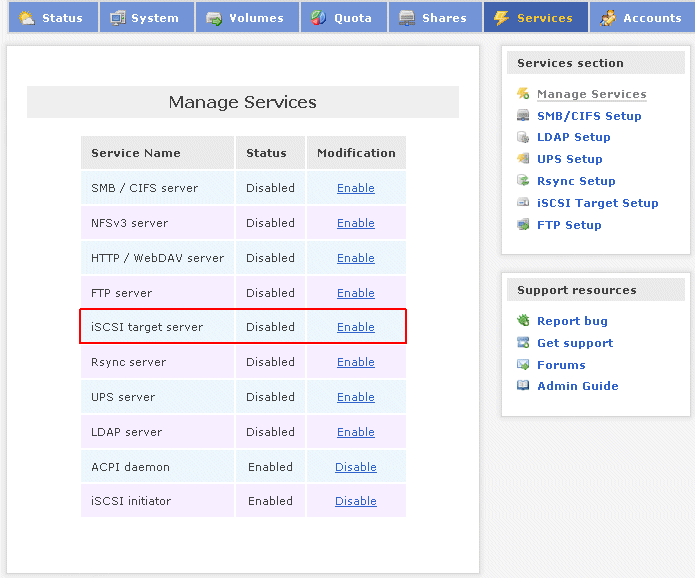
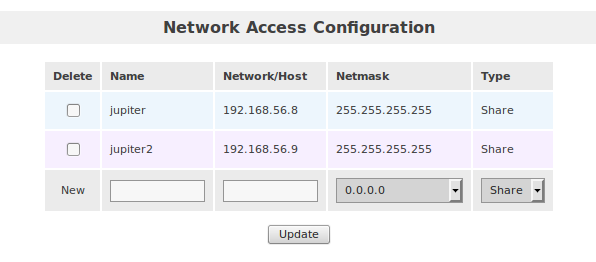
Then we need to grant access to jupiter in order to access the san.
Ready now to prepare the storage. Go to “Volumes/Block Devices”:

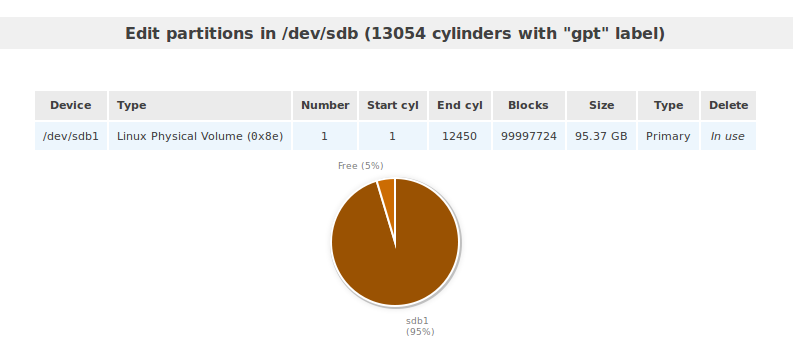
The disk we want to use for publishing is /dev/sdb. Click on that link in
order to partition it. Then create a big partition, spanning the entire disk.
Next, go to “Volumes/Volume Groups” and create a volume group called “oracle”.

Now, we can create the logical volumes. Go to “Volumes/Add Volume” and create a
new volume of type “block”. I gave 10G and I call it jupiter1.
It’s now time to configure our openfiler as an iSCSI target server. Go to
“Volumes/iSCSI Targets/Target Configuration”. Add the following Target IQN:
iqn.2006-01.com.openfiler:jupiter. Then go, to “LUN Mapping” and map this
volume. We also need to configure ACLs on the volume level using the “Network
ACL” tab:

Jupiter Setup
First of all, it is a good thing to upgrade to the last version. Multipath-ing
software may be affected by various bugs, so it’s better to run with the last
version available.
iSCSI Configuration
The following packages are mandatory:
device-mapper-multipath
device-mapper-multipath-lib
iscsi-initiator-utils
Next, configure the iscsi initiator:
service iscsid start
chkconfig iscsid on
chkconfig iscsi on
Ok, let’s import the iSCSI disks:
iscsiadm -m node -T iqn.2006-01.com.openfiler:jupiter -p 192.168.56.6
iscsiadm -m node -T iqn.2006-01.com.openfiler:jupiter -p 192.168.56.7
If it’s working, then we can set those disks to be added on boot:
iscsiadm -m node -T iqn.2006-01.com.openfiler:jupiter -p 192.168.56.6 --op update -n node.startup -v automatic
iscsiadm -m node -T iqn.2006-01.com.openfiler:jupiter -p 192.168.56.7 --op update -n node.startup -v automatic
Now we should have two new disks:
[root@jupiter ~]# fdisk -l

Disk /dev/sda: 52.4 GB, 52428800000 bytes
255 heads, 63 sectors/track, 6374 cylinders
Units = cylinders of 16065 * 512 = 8225280 bytes
Sector size (logical/physical): 512 bytes / 512 bytes
I/O size (minimum/optimal): 512 bytes / 512 bytes
Disk identifier: 0x00058a16

  Device Boot      Start         End      Blocks   Id  System
/dev/sda1   *           1        6375    51198976   83  Linux

Disk /dev/sdc: 11.5 GB, 11475615744 bytes
255 heads, 63 sectors/track, 1395 cylinders
Units = cylinders of 16065 * 512 = 8225280 bytes
Sector size (logical/physical): 512 bytes / 512 bytes
I/O size (minimum/optimal): 512 bytes / 512 bytes
Disk identifier: 0x30a7ae71

Disk /dev/sdb: 11.5 GB, 11475615744 bytes
255 heads, 63 sectors/track, 1395 cylinders
Units = cylinders of 16065 * 512 = 8225280 bytes
Sector size (logical/physical): 512 bytes / 512 bytes
I/O size (minimum/optimal): 512 bytes / 512 bytes
Disk identifier: 0x30a7ae71
Multipath Configuration
Start with a simple /etc/multipath.conf configuration file:
blacklist {
  devnode "^(ram|raw|loop|fd|md|dm-|sr|scd|st)[0-9]*"
  devnode "^hd[a-z]"
  devnode "^cciss!c[0-9]d[0-9]*[p[0-9]*]"
}

defaults {
  find_multipaths yes
  user_friendly_names yes
  failback immediate
}
Now, let’s check if the multipath can figure out how to aggregate the paths
under one single device:
[root@jupiter ~]# multipath -v2 -ll
mpathb (14f504e46494c4552674774717a782d7030585a2d31514b4d) dm-0 OPNFILER,VIRTUAL-DISK
size=11G features='0' hwhandler='0' wp=rw
|-+- policy='round-robin 0' prio=1 status=active
| `- 3:0:0:0 sdc 8:32 active ready running
`-+- policy='round-robin 0' prio=1 status=enabled
  `- 2:0:0:0 sdb 8:16 active ready running
As shown above, multipath has aggregated those two disks under the
mpathb/dm-0. The wwid of those disks is
14f504e46494c4552674774717a782d7030585a2d31514b4d. This piece of information
can be useful in order to set special properties on the disk level. For example,
we can assign an alias to this disk by adding the following section into the
configuration file.
multipaths {
  multipath {
    wwid                    14f504e46494c4552674774717a782d7030585a2d31514b4d
    alias                   oradisk
  }
}
Now, we can start the multipathd daemon:
fdisk should report now the new multipath disk:
Disk /dev/mapper/oradisk: 11.5 GB, 11475615744 bytes
255 heads, 63 sectors/track, 1395 cylinders
Units = cylinders of 16065 * 512 = 8225280 bytes
Sector size (logical/physical): 512 bytes / 512 bytes
I/O size (minimum/optimal): 512 bytes / 512 bytes
Disk identifier: 0x30a7ae71
You may partition it as you’d do with a regular disk.
Test the Multipath Configuration
The idea is to simulate a path failure. In this iSCSI configuration is easy to
do this by shutting down one eth at a time. For example, login to sun and
shutdown the eth0 interface:
In /var/log/messages of the jupiter server you should see:
Apr 22 16:48:06 jupiter kernel: connection2:0: ping timeout of 5 secs expired, recv timeout 5, last rx 4308454544, last ping 4308459552, now 4308464560
Apr 22 16:48:06 jupiter kernel: connection2:0: detected conn error (1011)
Apr 22 16:48:06 jupiter iscsid: Kernel reported iSCSI connection 2:0 error (1011 - ISCSI_ERR_CONN_FAILED: iSCSI connection failed) state (3)
You can confirm that the path is down using:
[root@jupiter ~]# multipath -ll
oradisk (14f504e46494c4552674774717a782d7030585a2d31514b4d) dm-0 OPNFILER,VIRTUAL-DISK
size=11G features='0' hwhandler='0' wp=rw
|-+- policy='round-robin 0' prio=1 status=active
| `- 3:0:0:0 sdc 8:32 active ready  running
`-+- policy='round-robin 0' prio=0 status=enabled
  `- 2:0:0:0 sdb 8:16 active faulty running
Note the faulty state for the 2:0:0:0 path.
Now, startup the eth0 interface:
In /var/log/messages you should see:
Apr 22 16:54:55 jupiter iscsid: connection1:0 is operational after recovery (26 attempts)
Apr 22 16:54:56 jupiter multipathd: oradisk: sdb - directio checker reports path is up
Apr 22 16:54:56 jupiter multipathd: 8:16: reinstated
Apr 22 16:54:56 jupiter multipathd: oradisk: remaining active paths: 2
Learned Lessons
If another disk is added in Open Filer, on the clients (jupiter) you need to
rescan the iSCSI disks:
Usually, the multipath daemon, if running, we’ll pick the new disk right away.
However, if you want to assign an alias, you’ll have to amend the configuration
file and do a:
service multipathd reload
According to my tests, adding a new disk can be done online. However, that
doesn’t apply in case of resizing an existing disk. Openfiler can only extend an
existing disk. Downsizing is not an option.
Even Openfiler allows you to increase the disk size via its GUI, the new size
is not seen by the initiators. Even though the initiator (jupiter) is rescanning
its iSCSI disks, their size is not refreshed. What I found is that you need to
restart the iSCSI target server service on Openfiler in order to publish the new
size. This is quite an annoying limitation, considering that you shouldn’t do
this if the published disks are in use. The conclusion is that it is possible to
add new disks online, but increasing the size of an existing disk can’t be done
online.


